How to Make Google Slides Vertical: Step-by-Step Guide to Change Slide Orientation in Google Slides
Simple Steps to Make Google Slides Vertical
Google Slides is an incredibly versatile tool for creating presentations, but by default, it operates in a horizontal (landscape) orientation. While this horizontal format excels for traditional laptop or desktop viewing, it often falls short when it comes to mobile convenience. This can even limit the effective implementation of certain graphics and charts, where a different aspect ratio is needed. That’s precisely when your content or design vision calls for a vertical (portrait) layout. Whether you’re designing an infographic, a truly mobile-optimized presentation, a poster, or even a printable document, knowing how to make Google Slides vertical can unlock a whole new realm of creative possibilities.
The good news? It’s surprisingly simple! This guide will walk you through the quick steps to transform your Google Slides presentation from horizontal to vertical.
Step-by-Step Guide to Change Slide Orientation in Google Slides
Step 1: Open Your Google Slides Presentation
First, open the Google Slides presentation you wish to modify. You can either start a brand new presentation or open an existing one.
Step 2: ”Access “Page setup”

In the top menu bar, click on “File.” From the dropdown menu, scroll down and select “Page setup.”
Step 3: Choose “Custom” Dimensions
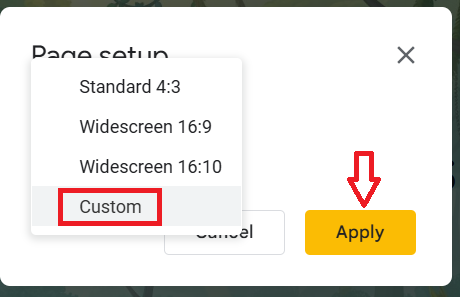
In the “Page setup” dialog box, you’ll see some default options like “Standard (4:3)” and “Widescreen (16:9).” To make your slides vertical, you need to select “Custom” from this dropdown.
To achieve a vertical layout, you need to ensure your height value is greater than your width value.
Step 4: Click “Apply”
Common Dimensions You Can Choose
- For Standard Paper (US Letter):
- Width:
8.5 inches - Height:
11 inches
- Width:
- For A4 Paper (International Standard):
- Width:
21 cm - Height:
29.7 cm
- Width:
- For a common mobile ratio (like 9:16):
- Width:
1080 pixels - Height:
1920 pixels
- Width:
Key Considerations When Changing Google Slides to Portrait Orientation
- Content Readjustment: Expect to rearrange and resize text boxes, images, shapes, and other elements on your slides. What worked well in a horizontal layout might look cramped or disproportionate in a vertical one.
- Redesign for Portrait: Most presentation templates are designed for landscape. Consider designing your slides from scratch with a vertical orientation in mind, or look for vertical-specific templates. Think in terms of vertical flow – perhaps stacking elements or using columns that become rows.
- Margins and White Space: Pay attention to your margins and ensure there’s enough white space around your content for readability.
- Image Resizing: Images will likely need to be resized or cropped to fit the new proportions without distortion.
- Testing: Always test your vertical presentation on various devices, especially mobile, to ensure it looks as intended.
Final Words
Transforming your Google Slides presentation to dynamic vertical portrait isn’t just a technical trick; it’s a creative choice that can significantly enhance your presentation’s impact, especially in our mobile-first world. While the default widescreen is familiar, understanding how to adjust your page setup unlocks a powerful new dimension for infographics, mobile-friendly content, and print-ready designs.
About The Author