Step-by-Step Guide to Insert Emojis in Google Slides

Add Special Characters & Insert Emojis in Google Slides
We’ve all been there: sitting through a presentation that just… drags. Whether it’s for business or education, a monotonous slideshow can quickly lead to yawns. But your Google Slides don’t have to suffer that fate!
Puzzled about how to infuse your presentations with energy and excitement? The answer lies in powerful visuals! By strategically inserting emojis and images, you can transform your Google Slides into dynamic, visually rich experiences that grab attention and amplify your message. Ready to learn how? Our guide will show you exactly how to insert images in Google Slides to make your content truly captivating.
The Power of Visuals (Adding Emojis & Special Characters)
Adding Emojis and special characters not just make presentation more interesting but also makes it more rememberable. Playful emojis aren’t just decorative; they’re incredibly powerful tools that can transform your Google Slides from a dull document into a dynamic experience.
Here’s how emojis can supercharge your presentations:
- Boost Engagement & Retention: Our brains process images far faster than text. A well-placed emojis and special characters can instantly grab attention, make your points more memorable, and help your audience retain information long after your talk ends.
- Break Up the Monotony: No one wants to stare at a wall of text. Emojis breaks it and provide welcome breaks, making your slides easier on the eyes and preventing cognitive overload.
- Add Personality & Emotion: Emojis, in particular, can inject a touch of warmth, humor, or emphasis, helping to convey tone and connect with your audience on a more personal level. Images can evoke emotion, set a mood, or simply make your content more relatable.
Step-by-Step Guide to Insert Emojis in Your Google Slides
Adding emojis in Google Slides can bring a fun, modern touch to your presentations, helping to convey emotion, break up text, or simply make a point more playfully and enhance the visual appeal. Here are the easiest ways to get them into your Google Slides and create visually appealing slides.
Method 1: Using Keyboard Shortcuts (The Quickest Way!)
Both Windows and Mac operating systems have built-in emoji pickers that work directly within Google Slides. This is often the most efficient method.
For Windows Users:
- Open your Google Slides presentation and navigate to the slide where you want to add an emoji.
- Click on the text box or shape where you want the emoji to appear, or simply click on the slide background if you want to insert it as a separate element.
- Press the Windows key + period (
.) or Windows key + semicolon (;) on your keyboard. - An emoji picker window will pop up.
- Browse through the categories (smiley faces, animals, food, etc.) or use the search bar at the top to find a specific emoji (e.g., “star,” “heart,” “bulb”).
- Click on the emoji you wish to insert. It will appear directly in your Google Slide.
- Close the emoji picker by clicking outside of it or pressing
Esc.
For Mac Users:
- Open your Google Slides presentation and go to the desired slide.
- Click within a text box or on the slide background.
- Press Command (â) + Control (â) + Spacebar on your keyboard.
- A character viewer (emoji picker) will appear.
- Browse the emoji categories at the bottom, use the search field at the top, or scroll through the available emojis.
- Double-click on the emoji you want to insert. It will be added to your slide.
- Close the character viewer by clicking outside of it.
Method 2: Copy and Paste from an Emoji Website
If for some reason the keyboard shortcuts aren’t working, or you want to browse a larger, more organized collection, you can copy emojis from a website.
- Open your web browser and go to a dedicated emoji website (e.g., Emojipedia.org, GetEmoji.com, or directly search “emoji list”).
- Find the emoji you want to use on the website.
- Click the “Copy” button usually provided next to the emoji, or simply highlight the emoji and press Ctrl+C (Windows) or Command+C (Mac).
- Go back to your Google Slides presentation.
- Click inside a text box or on the slide itself.
- Press Ctrl+V (Windows) or Command+V (Mac) to paste the emoji.
Guide to Add Special Characters in Google Slides

Google Slides has a handy built-in tool that allows you to easily insert a vast array of special characters, symbols, and even emojis.
Here’s how to use it:
- Open your Google Slides presentation and navigate to the slide where you want to insert a special character.
- Click inside the text box or shape where you want the special character to appear. If you want it to appear as a standalone element, you can simply click on an empty area of the slide (though it will technically be placed inside a new text box).
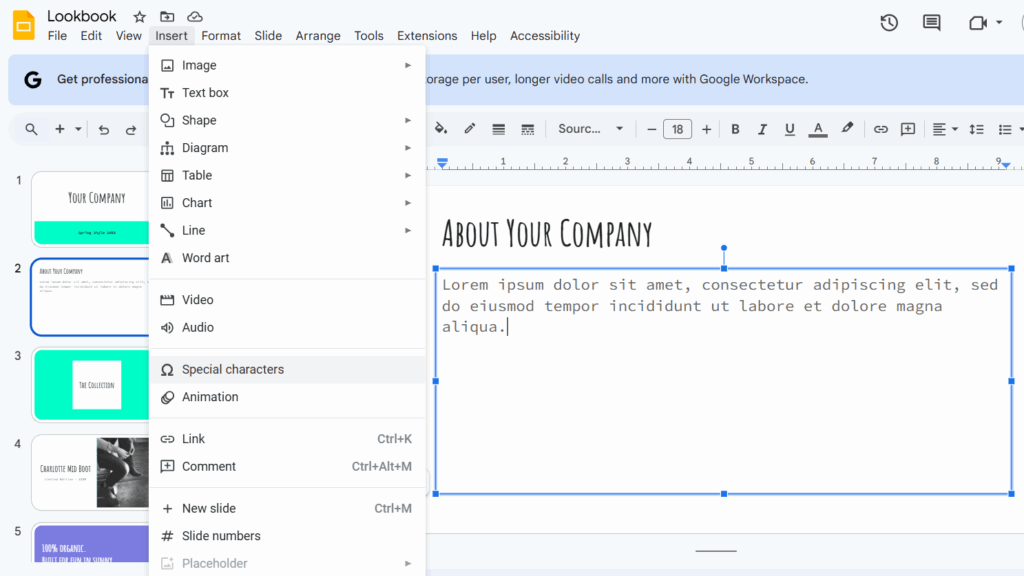
- Go to the ‘Insert’ menu in the top toolbar.
- From the dropdown menu, select ‘Special characters’.
- This will open the “Insert special characters” dialog box.
- Explore the Characters: The dialog box is divided into several helpful sections:
- Search bar: If you know the name or a related term for the character (e.g., “copyright,” “arrow,” “pi”), type it here.
- Category dropdown: This allows you to filter characters by broad categories like ‘Numbers’, ‘Punctuation’, ‘Symbols’, ‘Emoji’, ‘Mathematical symbols’, ‘Latin scripts’, ‘Greek’, etc. This is excellent for narrowing down your search.
- Symbol dropdown: Within a selected category, you can further refine by specific symbol sets (e.g., within ‘Symbols’, you can choose ‘Currency symbols’, ‘Arrows’, ‘Stars/Asterisks’, etc.).
- Drawing area: You can even try drawing the character with your mouse or trackpad in the right panel, and Google Slides will try to recognize it!
- Find and Insert Your Character:
- Once you’ve found the desired special character in the grid (either by Browse or searching), click on it.
- The character will instantly be inserted into your Google Slides presentation at your cursor’s last position.
- Continue Inserting or Close:
- You can continue to click on multiple characters in the dialog box; they will all be inserted sequentially.
- When you’re finished, simply click the ‘X’ button in the top right corner of the “Insert special characters” dialog box or click anywhere outside of it to close it.
Final Words
There you have it! Adding emojis and special characters, you now have the tools to utterly transform your Google Slides. No more plain, text-heavy presentations that leave your audience checking their watches.
By strategically incorporating emojis and special characters, you’re not just making your slides prettier; you’re making them more engaging, memorable, and impactful. You’re helping your audience connect with your message on a deeper level, ensuring your hard work truly shines. So, what are you waiting for? Dive into your next Google Slides project with confidence, and get ready to create presentations that truly pop!


