Table of Contents
- Google Slides Tutorial – Easy Guides for Students
- What Is Google Slides and What Is It Used For?
- How to Access and Open Google Slides
- How to Use Google Slides: A Step-by-Step Tutorial
- How to Make a Good Google Slides Presentation for Students
- 12 Creative Ways Students Can Use Google Slides
- How to Share and Collaborate on Google Slides
- How to Present Your Google Slides
- How to Download Google Slides as PowerPoint or PDF
- 10 Useful Google Slides Tips and Shortcuts for Students
- Common Google Slides Problems and How to Fix Them
- Final Thoughts
How to Use Google Slides: A Complete Beginner’s Guide for Students
Google Slides Tutorial – Easy Guides for Students
Creating presentations is an important part of school and college life. Whether you are preparing a science project, presenting a history assignment, sharing research findings, or working on a group project, a well-designed presentation can make your ideas easier to understand. Google Slides is one of the easiest tools students can use to create, edit, and share presentations online.
If you are new to Google Slides, don’t worry. You don’t need professional design skills or expensive presentation software to get started. With a Google account, you can create slides, add images and videos, customize layouts, and collaborate with classmates from almost anywhere.
In this beginner’s guide, we’ll explain how to use Google Slides step by step, explore its useful features, share practical presentation tips, and discover creative ways students can use it for school and college projects.
What Is Google Slides and What Is It Used For?
Google Slides is an online presentation application developed by Google. It allows users to create, edit, organize, and present information through a series of slides.
Similar to Microsoft PowerPoint, Google Slides lets you combine text, images, shapes, charts, videos, and other visual elements to communicate ideas. However, one of its biggest advantages is that your presentations can be stored in Google Drive and accessed through a web browser or supported mobile app.
Students can use Google Slides for:
- Creating school and college presentations.
- Preparing research projects and assignments.
- Designing visual study guides and revision notes.
- Working on group presentations with classmates.
- Creating interactive quizzes and storytelling projects.
- Presenting reports, ideas, and classroom activities.
Another useful feature is real-time collaboration. Multiple students can work on the same presentation, depending on their sharing permissions.
How to Access and Open Google Slides
Before creating your first presentation, you need access to Google Slides.
Follow these simple steps:
- Open your web browser and visit Google Slides.
- Sign in using your Google account.
- You will see the Google Slides homepage, where you can access existing presentations.
- Select a blank presentation or choose an available template.
- Your new presentation will open in the Slides editor.
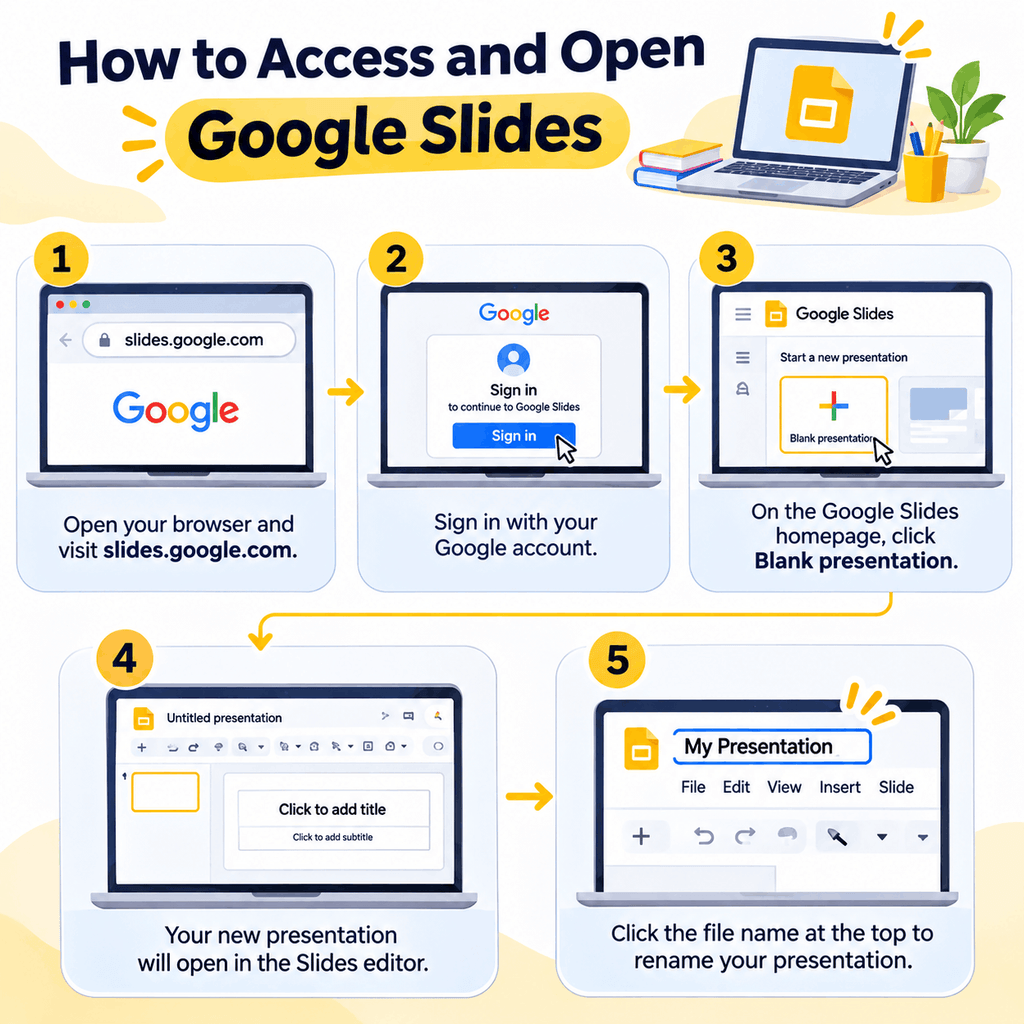
You can also create a presentation directly by visiting slides.google.com/create.
If you already use Google Drive, you can open it, select New, and choose Google Slides to create a presentation.
How to Use Google Slides: A Step-by-Step Tutorial
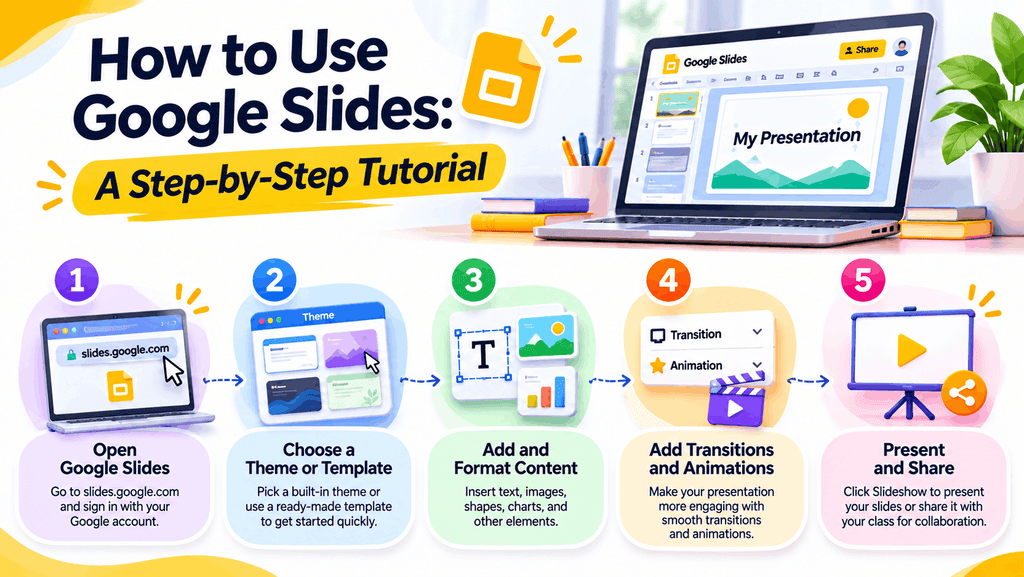
Now that you know how to access Google Slides, let’s explore how to create your first presentation.
1. Create a New Google Slides Presentation
Start by opening Google Slides and selecting Blank presentation.
A new presentation will appear with an initial title slide. Click the title and subtitle placeholders to add your presentation topic and a short introduction.
For example, if you are preparing a science assignment about the solar system, your opening slide could include:
- Title: Exploring the Solar System
- Subtitle: A Science Project by [Your Name]
- Class or subject details.
You can also rename your presentation by clicking the document name at the top of the editor.
2. Choose a Theme or Presentation Template
A theme determines the overall appearance of your presentation, including its colours, fonts, backgrounds, and default layouts.
To choose a theme:
- Open your presentation.
- Select Slide from the top menu.
- Click Change theme.
- Browse the available themes.
- Select a theme that matches your presentation topic.
For example, a science presentation might work well with a clean blue theme, while a history project could use warmer, more traditional colours.
You can also explore presentation templates to find ready-made layouts and save time designing every slide from scratch.
3. Understand the Google Slides Interface
Before adding content, it helps to understand the main parts of the editor.
Here are the important areas:
- Menu bar: Contains options such as File, Edit, View, Insert, Slide, Format, and Tools.
- Toolbar: Provides shortcuts for formatting text, inserting elements, changing layouts, and more.
- Slide panel: Displays all your slides in a vertical list on the left.
- Main workspace: The central area where you create and edit your current slide.
- Speaker notes: The section below the slide where you can add notes to help you present.
Understanding these areas makes it easier to navigate Google Slides and find the tools you need.
4. Add, Delete, Duplicate, and Rearrange Slides
Most presentations contain multiple slides that explain different parts of a topic.
To add a new slide, click the + button in the toolbar or use the keyboard shortcut Ctrl + M on Windows or Command + M on Mac.
You can also:
- Delete a slide: Right-click the slide thumbnail and select Delete.
- Duplicate a slide: Right-click the slide and select Duplicate slide.
- Rearrange slides: Drag and drop slide thumbnails into your preferred order.
Duplicating slides is particularly useful when you want to maintain a consistent design throughout your presentation.
5. Add and Format Text
Text is one of the most important elements of a presentation. You can use it to introduce topics, explain ideas, highlight important information, and summarize findings.
To add text:
- Select Insert from the menu.
- Choose Text box.
- Click and drag on the slide to create a text box.
- Type your content.
- Use the toolbar to change the font, size, colour, alignment, and other formatting options.
For better readability, use clear fonts and avoid filling your slides with lengthy paragraphs.
Try using short headings, bullet points, and important keywords to make your information easier to follow.
6. Insert Images, Shapes, and Illustrations
Visual elements can make your presentation more interesting and help explain complicated information.
Google Slides allows you to insert images, shapes, lines, and other visual elements.
To insert an image:
- Click Insert.
- Select Image.
- Choose an image source, such as your computer or Google Drive.
- Select the image you want to add.
- Resize and reposition it on your slide.
You can also use shapes and lines to create diagrams, flowcharts, timelines, and visual explanations.
Always choose images that are relevant to your topic and that you have permission to use.
7. Add Charts, Tables, and Diagrams
When presenting research or numerical information, charts and tables can make your content easier to understand.
For example:
- Use bar charts to compare different values.
- Use pie charts to show proportions.
- Use tables to organize research findings.
- Use diagrams to explain processes and relationships.
To insert these elements, select Insert and choose the relevant chart, table, or diagram option.
Keep your visuals simple and avoid displaying too much information in one place.
8. Change Backgrounds, Colours, and Layouts
A consistent design makes your presentation look organized and professional.
Google Slides provides several customization options.
To change a slide background:
- Select the slide you want to customize.
- Click Background in the toolbar.
- Choose a background colour or image.
- Apply the changes.
To change a slide layout, select the slide and click Layout in the toolbar. Choose a layout that suits the content you want to display.
You can also customize your presentation theme to maintain consistent colours and fonts across multiple slides.
9. Add Transitions and Animations
Transitions and animations can help introduce information gradually and make presentations more engaging.
A transition controls how one slide moves to the next, while an animation controls how an object appears or moves within a slide.
To add a transition:
- Select a slide.
- Open the Transition or motion controls.
- Choose an available transition effect.
- Adjust the speed if the option is available.
- Preview the result.
For animations, select an object such as text or an image and use the motion controls to add an effect.
Use animations carefully. Too many effects can distract your audience from the main message.
10. Add Speaker Notes
Speaker notes are useful when you need to explain your slides without putting all your information on the screen.
You can use them to include additional explanations, important facts, reminders, or examples.
To add speaker notes:
- Open the slide you want to present.
- Locate the speaker notes section below the slide.
- Click the section and type your notes.
- Repeat for other slides.
These notes can help you remember important talking points while presenting.
How to Make a Good Google Slides Presentation for Students
Creating slides is easy, but making a presentation that communicates your ideas effectively requires some planning.
Here are seven practical tips to improve your Google Slides presentations.
1. Start With a Clear Outline
Before opening Google Slides, decide what information you want to present.
Organize your content into an introduction, main discussion, supporting examples, and conclusion. This will help you maintain a logical flow.
2. Use Simple and Readable Fonts
Choose fonts that are easy to read from a distance. Avoid using too many different font styles in one presentation.
Use larger font sizes for headings and slightly smaller sizes for supporting information.
3. Choose Consistent Colours
Select two or three main colours that work well together. Use them consistently for headings, backgrounds, highlights, and other design elements.
4. Avoid Overcrowding Your Slides
Don’t try to fit an entire essay onto one slide. Break complicated information into smaller sections and distribute it across multiple slides.
5. Use Relevant Images and Diagrams
Images, illustrations, charts, and diagrams can help explain your ideas more effectively than lengthy descriptions.
Choose visuals that support your topic rather than simply decorating the slide.
6. Maintain a Consistent Layout
Keep your heading positions, font styles, colours, and spacing consistent. This creates a more organized presentation.
7. Practice Before Presenting
Review your slides, check for spelling mistakes, and rehearse your presentation. Practising beforehand will help you speak confidently and stay within your allotted time.
12 Creative Ways Students Can Use Google Slides
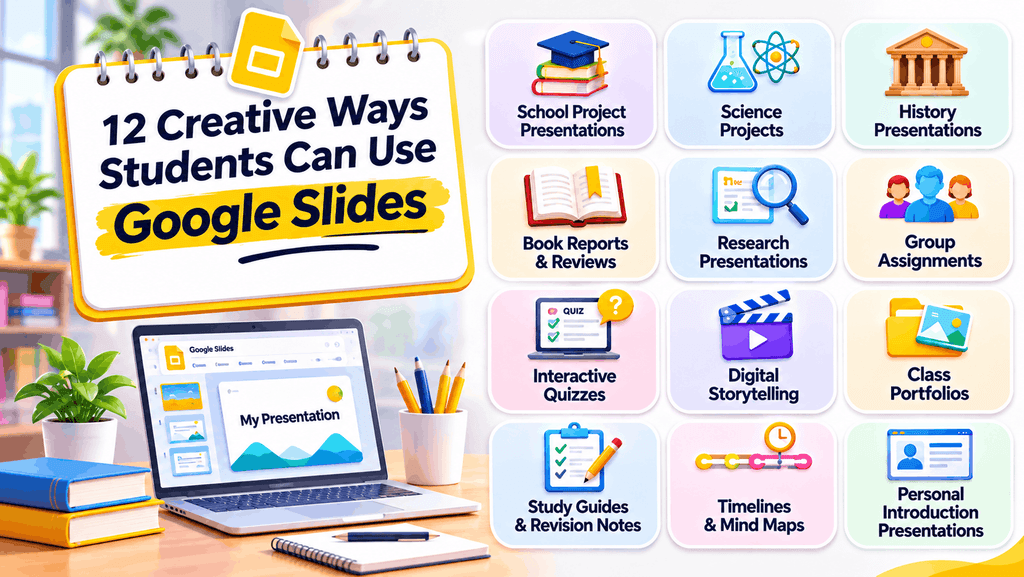
Google Slides is not limited to traditional classroom presentations. Students can use it for many different learning activities and creative projects.
Here are 12 practical ideas:
- School project presentations: Explain classroom topics using headings, images, diagrams, and supporting information.
- Science project presentations: Present experiments, scientific concepts, observations, and research findings.
- History presentations: Create timelines, explain historical events, and introduce important personalities.
- Book reports and reviews: Summarize stories, introduce characters, and share opinions about books.
- Research presentations: Organize research findings, statistics, and conclusions into an easy-to-follow slide deck.
- Group assignments: Collaborate with classmates to create one presentation with contributions from different members.
- Interactive quizzes: Create question slides with clickable answer choices and links to feedback slides.
- Digital storytelling: Combine text, images, and linked slides to create interactive stories.
- Class portfolios: Showcase completed projects, artwork, certificates, and academic achievements.
- Study guides: Organize revision notes, important definitions, and key concepts into visual study materials.
- Timelines and mind maps: Explain processes, historical developments, and relationships between ideas.
- Personal introduction presentations: Introduce yourself, your interests, hobbies, goals, and achievements.
These activities help students develop presentation skills, creativity, research abilities, and digital communication skills.
How to Share and Collaborate on Google Slides
One of the most useful Google Slides features is the ability to work with other people on the same presentation.
This is particularly helpful when completing group assignments or preparing classroom projects.
To share your presentation:
- Open the presentation you want to share.
- Click the Share button.
- Enter the email addresses of your classmates or teachers.
- Select the appropriate permission.
- Click Send.
Google Slides offers three main sharing permissions:
- Viewer: Allows someone to view the presentation without editing it.
- Commenter: Allows someone to view and leave comments.
- Editor: Allows someone to make changes to the presentation.
When working on a group project, you can give your teammates Editor access so everyone can contribute.
You can also use comments to suggest changes, ask questions, and provide feedback.
Always check your sharing settings before sending a presentation, especially if it contains personal or academic information.
How to Present Your Google Slides
Once your presentation is ready, you can display it to your audience directly from Google Slides.
Follow these steps:
- Open your completed presentation.
- Click Slideshow in the top-right corner.
- Your presentation will open in full-screen mode.
- Use the arrow keys or presentation controls to move between slides.
- Press Esc when you want to exit.
If you want to see your speaker notes while presenting, use the presenter view option when available.
Before presenting, check your display settings, review your slide order, and make sure your text and visuals are easy to read.
How to Download Google Slides as PowerPoint or PDF
Sometimes your teacher may ask you to submit your presentation as a PDF or PowerPoint file.
Google Slides allows you to download presentations in different formats.
To download your presentation:
- Open your Google Slides presentation.
- Click File in the menu bar.
- Select Download.
- Choose the format you need.
Common options include:
- Microsoft PowerPoint (.pptx)
- PDF document (.pdf)
- JPEG image (.jpg)
- PNG image (.png)
- Scalable Vector Graphics (.svg)
Choose PowerPoint if you need to continue editing the presentation in Microsoft PowerPoint. Choose PDF if you want to share a version that is convenient to view and print.
10 Useful Google Slides Tips and Shortcuts for Students
Learning a few shortcuts can help you create presentations more efficiently.
| Action | Windows / Chromebook | Mac |
|---|---|---|
| Create a new slide | Ctrl + M | Command + M |
| Undo | Ctrl + Z | Command + Z |
| Redo | Ctrl + Y | Command + Y |
| Copy | Ctrl + C | Command + C |
| Paste | Ctrl + V | Command + V |
| Cut | Ctrl + X | Command + X |
| Select all | Ctrl + A | Command + A |
| Find text | Ctrl + F | Command + F |
| Bold text | Ctrl + B | Command + B |
| Start slideshow | Ctrl + F5 | Command + Enter |
Keyboard shortcuts may vary depending on your browser, operating system, and keyboard settings.
Here are some additional tips:
- Use duplicate slides to maintain a consistent design.
- Use themes to save time on formatting.
- Add speaker notes to prepare for presentations.
- Use comments to collect feedback from classmates.
- Give your presentation a clear and descriptive filename.
Common Google Slides Problems and How to Fix Them
Even though Google Slides is beginner-friendly, you might occasionally experience problems.
Here are some common issues and their possible solutions.
1. Google Slides is not loading
Check your internet connection, refresh the browser, or try opening the presentation in another supported browser.
2. You cannot edit a presentation
Check whether you have Viewer or Commenter access. Ask the owner to provide Editor permission if you need to make changes.
3. Images are not appearing correctly
Check whether the image file is accessible and try inserting it again. You can also resize or reposition the image.
4. Your formatting changes after downloading
Some fonts, effects, or formatting elements may appear differently when a presentation is opened in another application. Review the downloaded file before submitting it.
5. You cannot access your presentation offline
Offline access needs to be configured in advance and depends on your device, browser, and account settings. Check Google’s offline access instructions before relying on it.
Final Thoughts
Google Slides is a practical tool for students who want to create presentations, organize information, and share ideas with classmates. From simple school assignments to detailed college research projects, it provides useful tools to turn information into engaging visual content.
The best way to learn Google Slides is to start creating. Experiment with different themes, layouts, images, charts, and presentation styles until you find what works for your project.
And remember, a great presentation isn’t just about adding attractive visuals. It’s about presenting your ideas clearly, keeping your audience interested, and making your information easy to understand.
Is Google Slides free for students?
Google Slides is available at no cost for basic personal use with a Google account. Some additional features may depend on an eligible Google Workspace subscription or school account.
Can I use Google Slides without downloading software?
Yes. You can create and edit presentations through a supported web browser without installing a desktop presentation application.
Can multiple students work on the same Google Slides presentation?
Yes. You can share a presentation with classmates and give them editing access. Multiple people can collaborate on the same presentation in real time.
Is Google Slides better than PowerPoint for students?
Both tools are useful for creating presentations. Google Slides is particularly convenient for browser-based access and online collaboration, while PowerPoint offers its own extensive presentation and desktop editing features. The best choice depends on your project requirements.
Can I convert Google Slides into PowerPoint?
Yes. Open your presentation, select File, choose Download, and select Microsoft PowerPoint (.pptx).
About The Author





Related Blogs