Table of Contents
- Easy guide to shape objects, shapes in PowerPoint
- What Does Grouping Shapes in PowerPoint Mean?
- How to Group Shapes in PowerPoint
- How to Group Multiple Objects in PowerPoint
- How to Ungroup Shapes in PowerPoint
- How to Group Shapes in PowerPoint Online
- Why Can’t I Group Objects in PowerPoint? (Common Problems and Fixes)
- Tips for Managing Grouped Shapes in PowerPoint
- Conclusion
How to Group shapes in PowerPoint

Easy guide to shape objects, shapes in PowerPoint
Working with multiple shapes in PowerPoint can sometimes make slide editing confusing, especially when you need to move, resize, or arrange several objects together. Whether you’re designing an infographic, creating a diagram, or organizing presentation elements, grouping shapes in PowerPoint makes the process much easier. It allows you to combine multiple objects into a single unit so you can move, resize, and format them together without disturbing their individual positions.
In this guide, we’ll walk you through how to group shapes in PowerPoint using different methods, including the ribbon menu, right-click options, and keyboard shortcuts. You’ll also learn how to ungroup and regroup objects, work with pictures and text boxes, and fix common grouping issues. Let’s get started!
What Does Grouping Shapes in PowerPoint Mean?
Grouping shapes in PowerPoint means combining two or more objects into a single unit so you can manage them together. Instead of selecting and moving each shape individually, you can group them and treat them as one object. This is especially useful when creating diagrams, flowcharts, infographics, or other visual elements that contain multiple shapes.
For example, if you create a diagram using circles, arrows, text boxes, and icons, you can group all these elements together. Once grouped, you can move, resize, rotate, or apply formatting to the entire group without changing the position of individual objects.
Here are some benefits of grouping shapes in PowerPoint:
- Easy positioning: Move multiple shapes together without selecting each one.
- Consistent resizing: Resize several objects while maintaining their relative positions.
- Better organization: Keep related design elements together on a slide.
- Faster editing: Apply formatting, rotation, and other changes to multiple objects at once.
- Maintain alignment: Prevent individual elements from shifting accidentally while editing your presentation.
How to Group Shapes in PowerPoint
PowerPoint offers several ways to group shapes, allowing you to combine multiple objects and manage them as a single unit. You can use the right-click menu, the Shape Format tab, or keyboard shortcuts to group your selected objects. Follow these simple methods to group shapes in your presentation.
Method 1: Group Shapes Using the Right-Click Menu
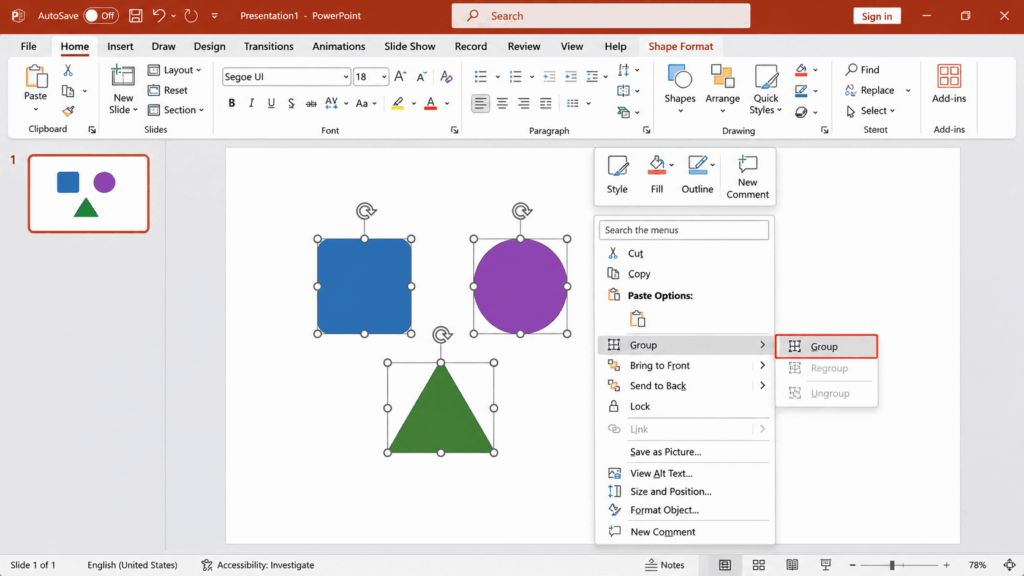
This is one of the quickest ways to group multiple shapes in PowerPoint. You can select the objects you want to combine and use the context menu to group them.
Follow these steps:
- Open your PowerPoint presentation and navigate to the slide containing the shapes.
- Hold the Ctrl key (Windows) or Command key (Mac) and click each shape you want to group.
- Once all the shapes are selected, right-click on any of the selected objects.
- Hover over the Group option in the context menu.
- Select Group from the submenu.
Your selected shapes will now be combined into a single group. You can move, resize, or rotate them together without changing their individual positions.
Method 2: Group Shapes Using the Shape Format Tab
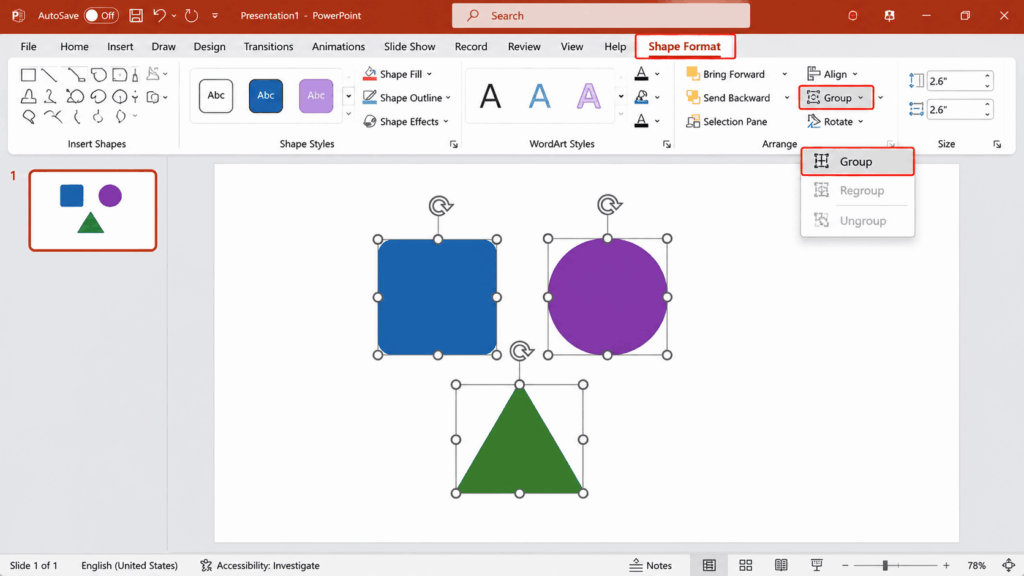
You can also group multiple shapes directly from PowerPoint’s ribbon menu. This method is useful when you want to access grouping options while editing your slide.
Follow these steps:
- Select the multiple shapes you want to combine using Ctrl + Click (Windows) or Command + Click (Mac).
- Go to the Shape Format tab in the PowerPoint ribbon.
- Find the Arrange section.
- Click the Group dropdown option.
- Select Group from the available options.
PowerPoint will combine the selected objects into one group, making it easier to manage and position them together.
Method 3: Group Shapes Using Keyboard Shortcuts
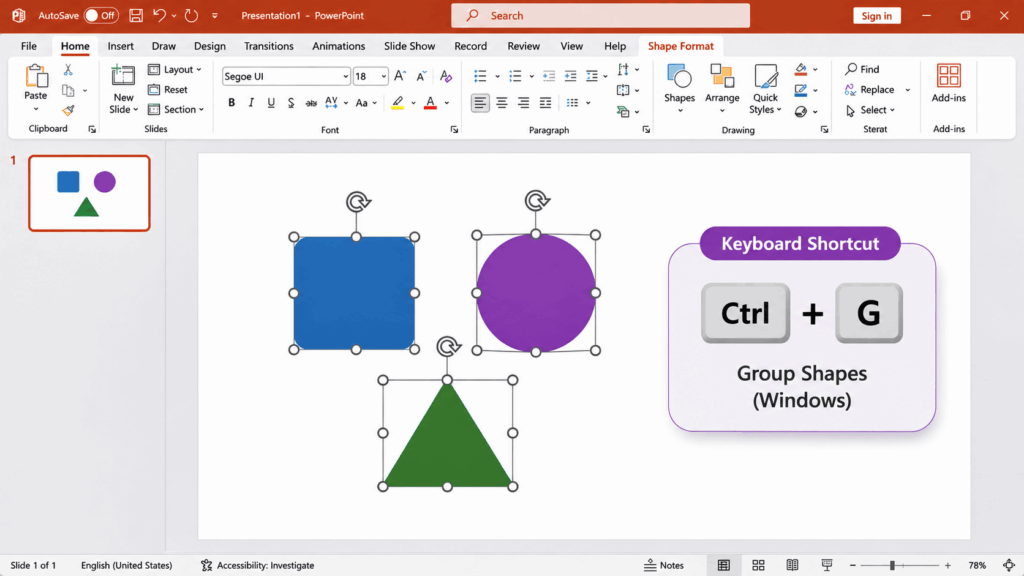
If you frequently work with multiple shapes, keyboard shortcuts can save time and make your editing process faster.
Follow these steps:
- Select all the shapes you want to group.
- Press Ctrl + G on Windows.
- On Mac, use Command + Option + G in supported desktop versions.
The selected objects will be grouped together instantly.
Tip: Make sure you select at least two compatible objects before using the keyboard shortcut. Otherwise, the grouping command may not be available.
How to Group Multiple Objects in PowerPoint
PowerPoint allows you to group more than just basic shapes. You can combine different elements, such as pictures, icons, text boxes, and illustrations, into a single group. This is particularly useful when creating infographics, diagrams, charts, and presentation layouts where multiple objects work together.
Here are some common ways to group different objects in PowerPoint.
How to Group Pictures in PowerPoint
If your slide contains multiple pictures that you want to move or resize together, you can group them into one object.
Follow these steps:
- Open the PowerPoint slide containing the pictures.
- Hold the Ctrl key on Windows or Command key on Mac.
- Click each picture you want to group.
- Right-click on the selected pictures.
- Choose Group > Group from the context menu.
Your pictures will now behave as a single object, allowing you to move, resize, and reposition them together.
How to Group Text Boxes and Shapes in PowerPoint
You can also combine text boxes with shapes to create labels, callouts, diagrams, and other visual elements.
Follow these steps:
- Insert the shapes and text boxes you want to combine.
- Position the text boxes over or next to the corresponding shapes.
- Hold Ctrl (Windows) or Command (Mac) and select the objects.
- Right-click on the selection.
- Choose Group > Group.
The text boxes and shapes will now move together as one object, helping you maintain your slide layout while editing.
How to Group Icons and Other Design Elements
Grouping icons with shapes and decorative elements is useful when designing infographics, process diagrams, and presentation graphics.
Follow these steps:
- Insert the icons and other design elements into your slide.
- Arrange them in the desired position.
- Select all the elements you want to combine.
- Right-click and choose Group > Group.
- Move or resize the grouped elements as needed.
You can now manage the entire visual component without selecting each individual element.
Note: PowerPoint does not support grouping every object type. Some objects, such as certain placeholders, embedded content, or SmartArt components, may need to be handled differently. If the Group option is unavailable, check the object types and selection.
How to Ungroup Shapes in PowerPoint
If you want to edit, move, or resize individual objects after grouping them, you can use the Ungroup option in PowerPoint. Ungrouping separates the combined objects and allows you to work with each shape, picture, or text box independently.
Here are three simple ways to ungroup objects in PowerPoint.
Method 1: Ungroup Shapes Using the Right-Click Menu
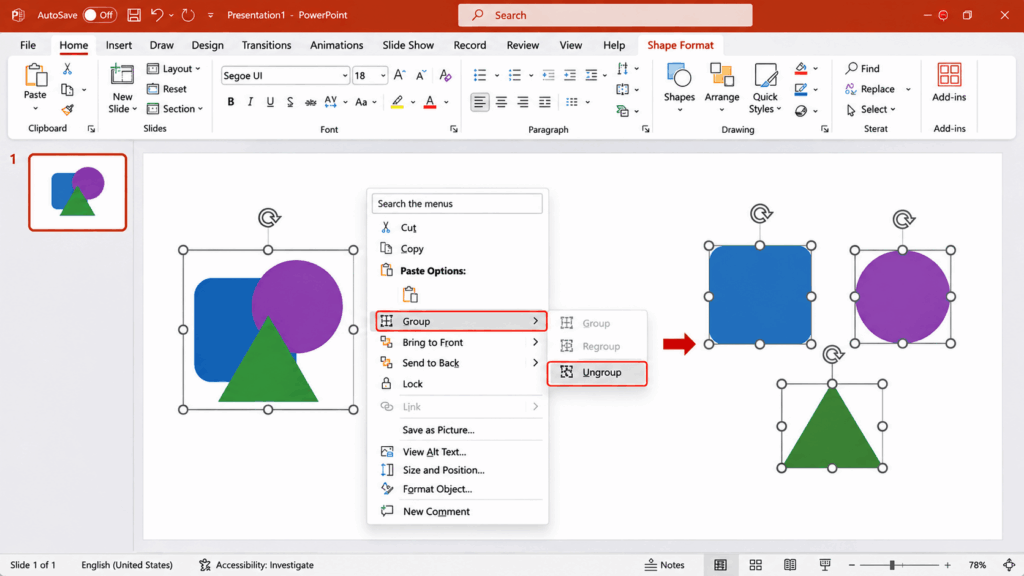
This is the easiest way to separate grouped objects on your slide.
Follow these steps:
- Open your PowerPoint presentation.
- Click the grouped object you want to separate.
- Right-click on the selected group.
- Hover over the Group option.
- Select Ungroup from the submenu.
PowerPoint will separate the grouped objects, allowing you to select and edit each element individually.
Method 2: Ungroup Shapes Using the Shape Format Tab
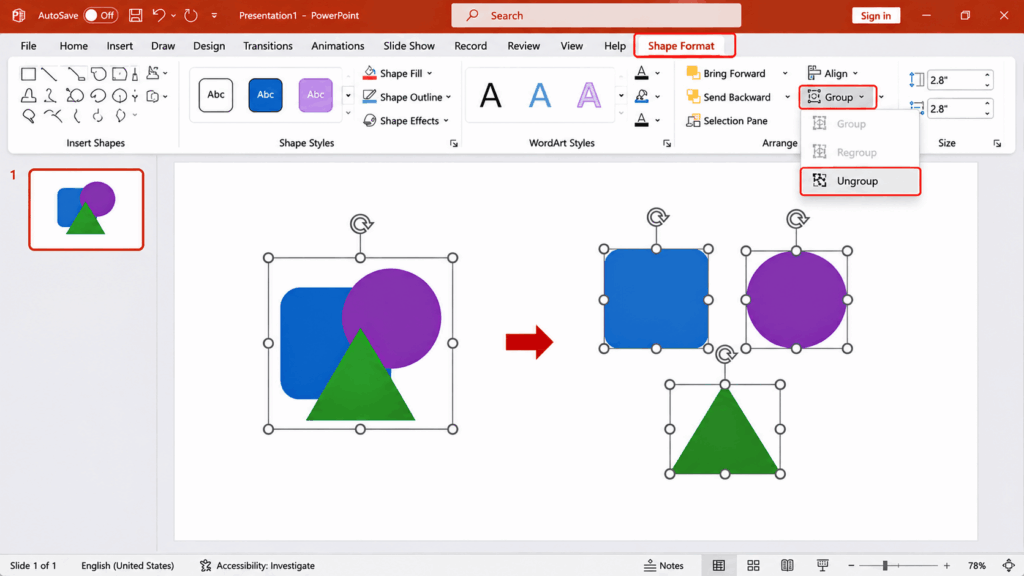
You can also ungroup objects directly from the Shape Format tab.
Follow these steps:
- Select the grouped object on your slide.
- Go to the Shape Format tab in the ribbon.
- Find the Arrange section.
- Click the Group dropdown menu.
- Select Ungroup.
Your grouped objects will now become separate elements that you can edit independently.
Method 3: Ungroup Shapes Using Keyboard Shortcuts
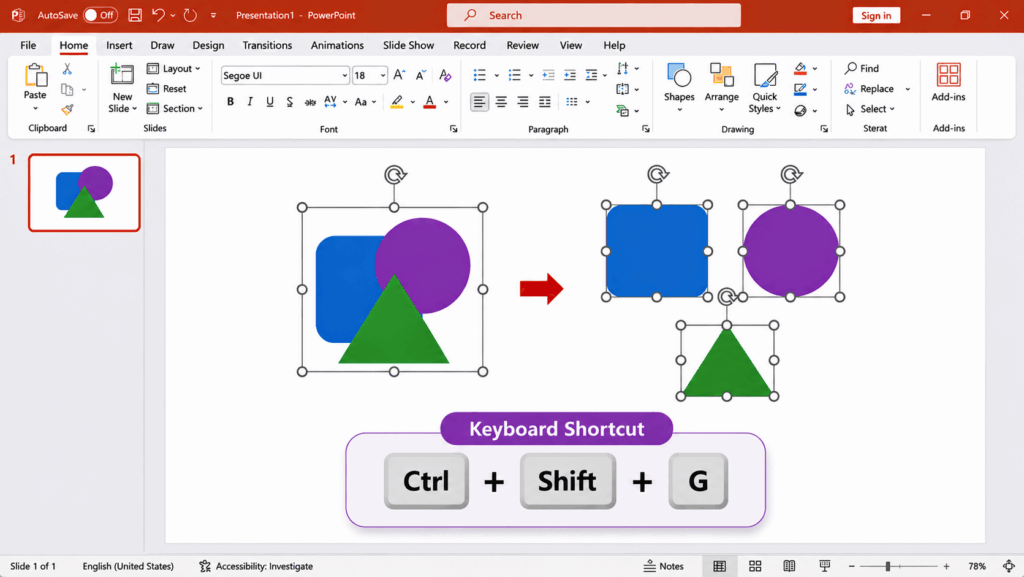
If you prefer using keyboard shortcuts, PowerPoint provides a quick way to ungroup selected objects.
Follow these steps:
- Select the grouped object you want to separate.
- Press Ctrl + Shift + G on Windows.
- PowerPoint will immediately ungroup the selected objects.
This shortcut is particularly useful when working with complex slides containing multiple grouped elements.
Tip: Ungrouping does not delete your objects or their content. It simply separates them so you can edit each element individually. Once you finish editing, you can select the objects again and group them back together.
- How to Regroup Shapes in PowerPointIf you have ungrouped objects but want to combine them again, PowerPoint provides a Regroup option. It allows you to restore a previously grouped set of objects without selecting and grouping each element from scratch.This feature is useful when you temporarily separate shapes to edit individual elements and then want to bring them back together.Follow these steps to regroup shapes in PowerPoint:
- After ungrouping the objects, make the necessary changes to individual shapes.
- Select any one of the previously ungrouped objects.
- Right-click on the selected object.
- Hover over the Group option in the context menu.
- Select Regroup from the submenu.
- Open your PowerPoint presentation on your Mac.
- Navigate to the slide containing the shapes you want to combine.
- Hold the Shift key and click each shape you want to select.
- Once all the objects are selected, go to the Shape Format tab in the ribbon.
- Find the Arrange section and click Group.
- Select Group from the dropdown menu.
- Select the grouped object on your slide.
- Go to the Shape Format tab.
- Click Arrange and select Group.
- Choose Ungroup from the dropdown menu.
How to Group Shapes in PowerPoint Online
If you use PowerPoint Online through your web browser, you can also group multiple shapes and objects without installing the desktop application. The process is similar to the desktop version, allowing you to combine related elements and manage them together while editing your presentation.
Follow these steps:
- Open PowerPoint Online and sign in to your Microsoft account.
- Open the presentation you want to edit.
- Navigate to the slide containing the shapes you want to group.
- Hold the Ctrl key (Windows) or Command key (Mac) and select the objects you want to combine.
- Open the Shape or Shape Format tab in the ribbon.
- Look for the Arrange option and select Group, if available.
- Click Group to combine the selected objects.
Once grouped, you can move and resize the selected objects together, making it easier to organize your slide layout.
How to Ungroup Shapes in PowerPoint Online
To separate grouped objects, select the group, open the Arrange menu, and choose Ungroup, if the option is available in your version.
Note: PowerPoint for the web may have different grouping options depending on the object types and available editing features. If you cannot find the Group or Ungroup command, try opening the presentation in the PowerPoint desktop application.
Why Can’t I Group Objects in PowerPoint? (Common Problems and Fixes)
Sometimes, you may find that the Group option is greyed out or unavailable when trying to combine shapes and other objects in PowerPoint. This usually happens because of the types of objects selected, the way they are arranged, or the current selection.
Here are some common grouping problems and how to fix them.
1. The Group Option Is Greyed Out
Problem: You have selected multiple objects, but the Group option is disabled.
Solution: Make sure you have selected at least two compatible objects. Some PowerPoint elements, such as slide placeholders and certain embedded objects, cannot be grouped directly. Try selecting ordinary shapes, pictures, or text boxes instead.
2. You Cannot Select Multiple Shapes
Problem: PowerPoint selects only one shape even when you try to select several objects.
Solution: Hold the Ctrl key on Windows or Shift key on Mac while clicking each object. You can also use the Selection Pane to select individual objects more easily.
3. You Cannot Group Text and Shapes Together
Problem: The Group option is unavailable when you select a text placeholder and a shape.
Solution: If the text is inside a slide placeholder, copy it into a regular text box. Then select the text box and the shape together and try grouping them again.
4. You Cannot Group SmartArt Objects
Problem: You want to group individual elements inside a SmartArt graphic, but PowerPoint does not allow it.
Solution: SmartArt graphics are managed as structured objects rather than ordinary shapes. If you need to work with their individual elements, you can convert the SmartArt graphic into shapes using the appropriate conversion option, where supported. Keep a copy of the original SmartArt because the conversion may remove some SmartArt editing features.
5. You Cannot Find the Group Option
Problem: You have selected multiple objects but cannot locate the Group command.
Solution: Check the Shape Format tab and look under the Arrange section. You can also right-click the selected objects and look for Group > Group in the context menu.
6. You Cannot Select Overlapping Shapes
Problem: Multiple shapes overlap, making it difficult to select the object you want.
Solution: Open the Selection Pane from the Home or Shape Format ribbon, depending on your PowerPoint version. It displays a list of objects on the slide, allowing you to select individual shapes without clicking directly on them.
Tip: If grouping still does not work, check whether any selected objects are unsupported or locked. Try selecting two simple shapes first to identify whether the issue is related to a particular object type.
Tips for Managing Grouped Shapes in PowerPoint
Grouping shapes makes it easier to organize your presentation, but managing multiple groups effectively can make your editing process even smoother. Whether you’re designing infographics, diagrams, or business presentations, these tips will help you keep your slides organized and maintain consistent layouts.
Here are some useful tips for working with grouped objects in PowerPoint.
1. Group Related Objects Together
Combine shapes, icons, text boxes, and other elements that belong to the same visual component. For example, group an icon with its label and background shape so you can move the entire component together.
2. Use the Selection Pane to Manage Objects
When your slide contains many shapes and groups, use the Selection Pane to find and select specific objects. You can also rename objects to identify them more easily while editing complex slides.
3. Align Objects Before Grouping
Arrange your shapes using PowerPoint’s alignment and distribution tools before grouping them. This helps maintain consistent spacing and makes your grouped elements look more professional.
4. Avoid Grouping Unrelated Elements
Don’t combine every object on a slide into one large group. Instead, create smaller groups based on related content or visual components. This makes individual elements easier to edit later.
5. Keep a Copy Before Making Major Changes
Before ungrouping or modifying complex graphics, consider duplicating the original group. This gives you a backup if you need to restore the previous design.
6. Use Descriptive Names for Groups
If your presentation contains multiple grouped objects, use the Selection Pane to rename them with meaningful names such as “Process Diagram,” “Title Section,” or “Infographic Icons.” This makes it easier to locate specific elements.
By following these tips, you can manage grouped shapes more efficiently, keep your slides organized, and make presentation editing much easier.
Conclusion
Grouping shapes in PowerPoint is a simple yet useful feature that makes organizing and editing presentation elements much easier. Whether you’re combining shapes, pictures, icons, or text boxes, grouping allows you to move, resize, and manage multiple objects as a single unit. With options to group, ungroup, and regroup objects, you can maintain your slide layout while making changes whenever needed.
By following the methods and tips in this guide, you can work with PowerPoint objects more efficiently and create cleaner, well-organized slides. If you want to save time designing professional presentations, explore SlideChef’s collection of ready-to-use PowerPoint templates and find designs that you can easily customize for your next presentation.
What is the shortcut to group shapes in PowerPoint?
The keyboard shortcut to group selected shapes in PowerPoint on Windows is Ctrl + G. On Mac, use Command + Option + G in supported desktop versions. Select at least two compatible objects before using the shortcut.
Can you group pictures and shapes together in PowerPoint?
Yes, PowerPoint allows you to group pictures and shapes together. Select the pictures and shapes you want to combine, right-click the selection, and choose Group > Group. You can then move and resize them together.
Can I edit individual shapes after grouping them?
Yes. You can select an individual shape within a group to make certain edits without ungrouping everything. If you want to work with each object separately, right-click the group and select Group > Ungroup.
How do I ungroup multiple shapes in PowerPoint?
Select the grouped object, right-click it, hover over Group, and select Ungroup. You can also select the group and press Ctrl + Shift + G on Windows to separate the objects.
Why is the Group option greyed out in PowerPoint?
The Group option may be greyed out if you have selected only one object or if your selection contains unsupported elements. Make sure you select at least two compatible objects, such as ordinary shapes, pictures, or text boxes.
Can I group objects in PowerPoint Online?
Yes, PowerPoint for the web supports grouping compatible objects in supported editing scenarios. Select multiple objects and look for the Group option under the Arrange menu. Some grouping features may differ from the desktop application.
Can I group SmartArt objects in PowerPoint?
SmartArt graphics are treated differently from ordinary shapes. You may need to convert the SmartArt graphic into individual shapes, where supported, before grouping or editing its individual elements.
How do I regroup shapes after ungrouping them?
Select an object from the previously ungrouped group, right-click it, and choose Group > Regroup, if available. PowerPoint will restore the previous grouping. If Regroup is unavailable, select the objects manually and use the Group option.
About The Author





Related Blogs