

Table of Contents
- Google Slides Tutorial – Change Opacity of Shapes in Google Slides
- The Golden Rule: Transparency vs. Opacity in Google Slides
- How to Change Image Opacity in Google Slides
- How to Change Shape Opacity (Rectangles, Circles, etc.)
- How to Change Text Box Opacity in Google Slides
- How to Make a Background Image Transparent
How to Change Opacity in Google Slides

Google Slides Tutorial – Change Opacity of Shapes in Google Slides
You are not going crazy—changing opacity in Google Slides is genuinely frustrating because the platform buries the controls for images and shapes in completely different menus. While most modern design tools offer a single, universal opacity slider, Google Slides forces you to navigate entirely separate toolbars depending on the specific element you are trying to edit. Whether you are trying to fade a distracting photo, build a semi-transparent shape overlay, or watermark a presentation, this guide eliminates the guesswork. Below, we break down the exact, step-by-step menu paths to adjust the transparency for images, solid shapes, text boxes, and full slide backgrounds.
The Golden Rule: Transparency vs. Opacity in Google Slides
Before diving into the menus, it is important to understand how Google Slides labels its tools. In design terminology, “opacity” refers to how solid an object is, while “transparency” refers to how see-through it is.
While you might be searching for an “opacity” button, the desktop version of Google Slides exclusively uses the term Transparency. Because these concepts are exact opposites, lowering the opacity of an image or shape means you must increase its transparency. When you drag the Google Slides transparency slider to the right, your element becomes more see-through (less opaque). Keep this terminology flip in mind as you navigate the platform’s formatting menus.
How to Change Image Opacity in Google Slides

On Desktop (Web Browser)
To adjust image opacity on a computer, you must use the dedicated formatting panel rather than the top toolbar buttons. Follow this exact click-path:
- Right-click the image on your slide.
- Select Format options from the dropdown menu to open the right-hand sidebar.
- Click on Adjustments to expand that section.
- Drag the Transparency slider to the right to fade the image.
On the Mobile App (iOS & Android)
The Google Slides mobile app alters the interface terminology, switching the desktop’s “Transparency” label to an “Opacity” label.
- Tap the image on your slide to select it.
- Open the Adjustments menu from the bottom toolbar.
- Drag the Opacity slider to adjust how solid or see-through the image appears.
How to Change Shape Opacity (Rectangles, Circles, etc.)
Solid Shape Transparency
If you right-click a shape and select “Format options,” you will not find a transparency slider. Google Slides handles shape opacity strictly within the color palette tools rather than the formatting sidebar.
- Select the shape on your slide.
- Click the Fill color (paint bucket) icon in the top toolbar.
- Click the + (Custom) button under the “Solid” tab.
- Drag the Transparency slider at the bottom of the color picker window to adjust the opacity, then click OK.

Gradient Transparency (Advanced)
You can create fading shapes or soft overlays by adjusting the transparency of specific color points within a gradient.
- Select the shape, click the Fill color icon, and select the Gradient tab.
- Click the + (Custom) button to open the gradient builder.
- Select a specific Gradient stop (the circular color markers beneath the main color bar).
- Adjust the Transparency slider on the right for that individual stop.
- Repeat for other stops as needed to create a smooth, fading effect across the shape.
How to Change Text Box Opacity in Google Slides
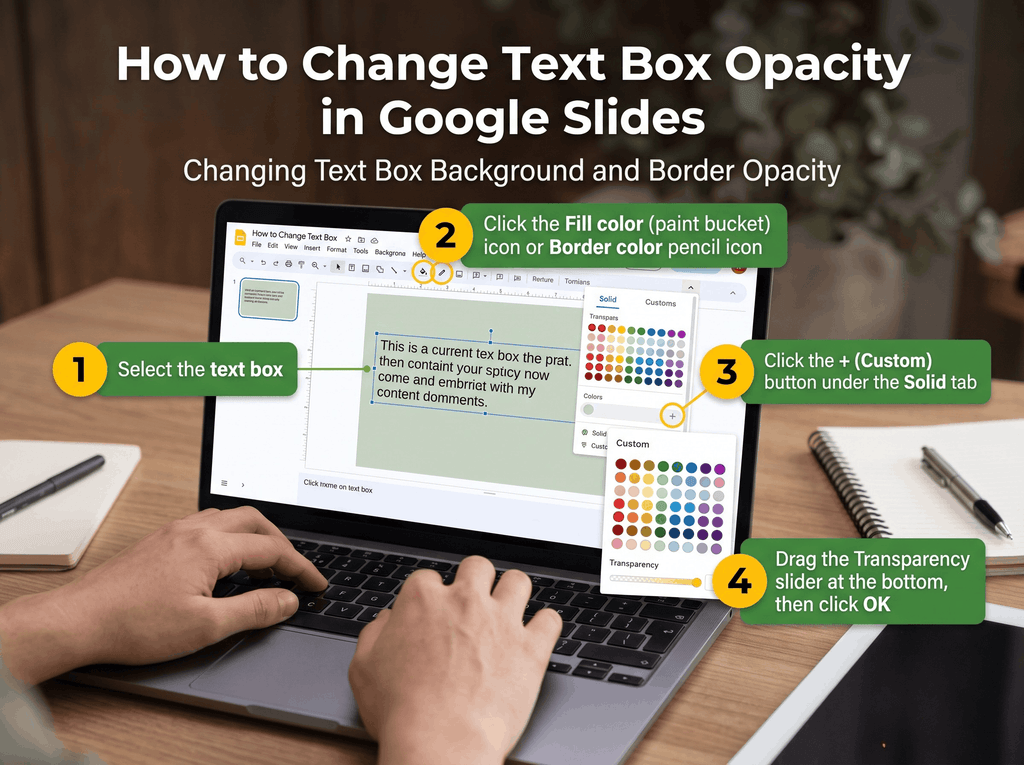
Google Slides does not feature a direct opacity slider for standard text characters. However, depending on whether you want to fade the background box, the border, or the actual text itself, you can use a few quick workarounds to achieve the exact look you need.
Changing Text Box Background and Border Opacity
If your text box has a colored fill or border that is too solid and distracting, you can adjust its transparency directly through the color palette:
- Click on the text box to select it.
- Click the Fill color (paint bucket) icon in the top toolbar. (Or click the Border color pencil icon if you want to adjust the border).
- Click the + (Custom) button under the “Solid” tab.
- Drag the Transparency slider at the bottom of the pop-up window to make the background or border see-through, then click OK.
How to Make Text Transparent (The Word Art Workaround)
Because standard text boxes do not support a text-specific opacity slider, you can use Word Art to treat your text like a shape:
- In the top menu, go to Insert > Word Art.
- Type your text and press Enter.
- With your Word Art selected, click the Fill color icon in the toolbar.
- Click + (Custom) and use the Transparency slider to fade the text characters to your desired opacity level.
Using a Semi-Transparent Shape Overlay
If you have a standard text box placed over a busy image or background and need to make the text readable without altering the text font itself:
- Insert a rectangle shape over your background area.
- Go to Fill color > Custom and set a dark or light color with about 40% to 60% transparency.
- Remove the shape border by clicking the Border color icon and selecting Transparent.
- Right-click the shape, go to Order, and select Send to back.
- Place your text box on top of this shape to create a clean, readable contrast layer.
How to Make a Background Image Transparent
If you have ever tried to fade a background image to make your text more readable, you have likely run into a frustrating roadblock. When you set an image using the Slide > Change background tool, Google Slides locks the image to the canvas and completely disables all formatting options—meaning there is no transparency slider available.
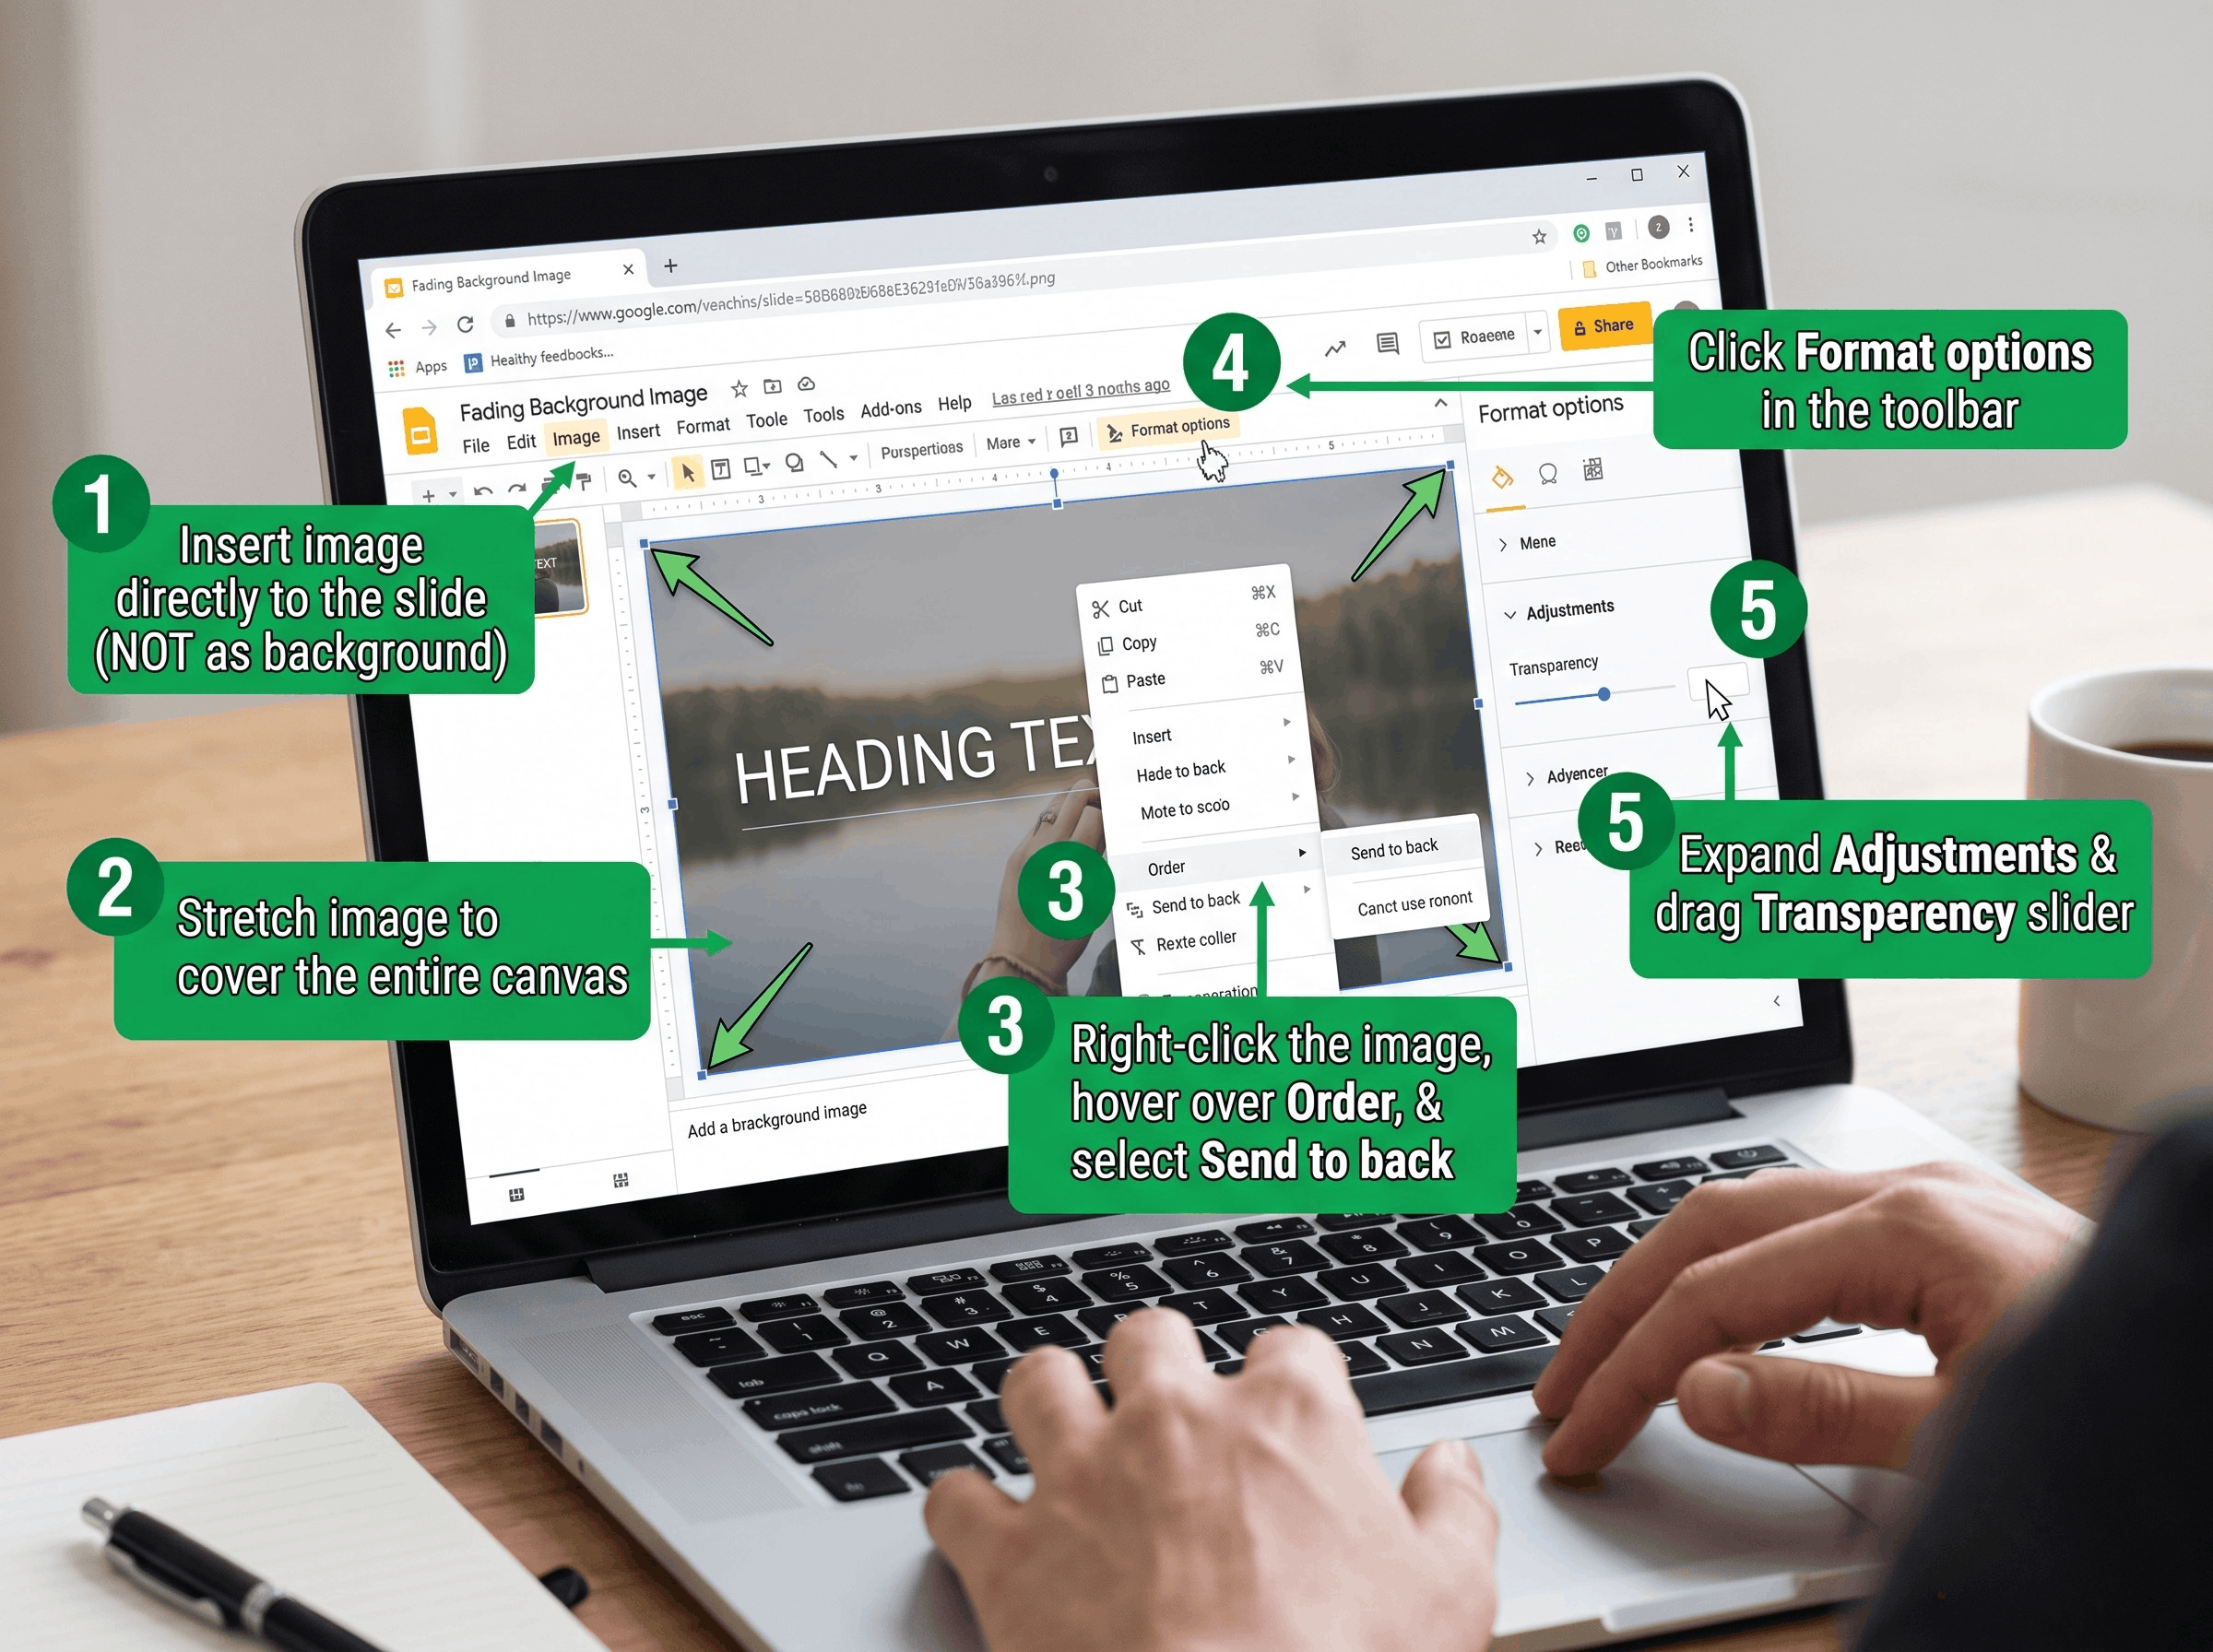
To adjust the opacity of a background image, you cannot use the native background tool. Instead, you must use this simple layering workaround:
- Go to Insert > Image and upload your picture directly onto the slide.
- Drag the corners of the image to stretch it until it completely covers the entire slide canvas.
- Right-click the image, hover over Order, and select Send to back (or use the keyboard shortcut
Ctrl + Shift + Down Arrowon Windows /Cmd + Shift + Down Arrowon Mac). This places the image behind your text and shapes. - With the image still selected, click Format options in the top toolbar.
- Expand the Adjustments menu and drag the Transparency slider to the right to fade the image into a subtle, see-through background.
Mastering how to change opacity in Google Slides requires navigating a few different menus, but understanding these quirks unlocks a new level of design flexibility. Whether you are softening a distracting background image, building elegant semi-transparent overlays, or using the Word Art workaround to fade your text, these adjustments are essential for creating professional and easily readable slides. If you want to skip the manual formatting entirely and jump straight into an eye-catching deck, explore the massive library of free, fully customizable designs at SlideChef. With expertly balanced layouts and pre-set visual effects ready to go, you can save hours of design time and focus entirely on delivering a compelling message.
About The Author





Related Blogs